Wednesday 4 April 2012

Cheshire Cat

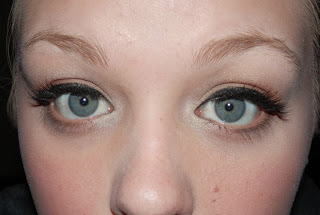
I decided to do a quick look today for you guys since I have been gone for ages. I have been super busy at work and just in general so decided that I would post looks instead of tutorials for a little while.

This look is based on the Cheshire cat from Alice in Wonderland. This colour combination is one of my favourites when I want a attention grabbing make up look.


Products Used:

Lime Crime Candy Eyed Eyeshadow Helper (Primer)
Sugarpill Chromalust in Hysteric 
BH Costmetics 88 Shimmer Palette
Sugarpill Chromalust in Tiara 
Loreal Linear Intense 
Diorshow Black Out Waterproof Mascara.
ELF Studio Eyebrow Kit in Ash.


Hope you like it!

Thursday 2 February 2012

My Favourite Nail Polish!

Just a quick post about my favourite nail polish! I love love love this, the formula, the color and how long it lasts!

It's Russian Roulette by Essie!


Oily Skin Care Tip No.1 : Using a Toner

I have combination skin which means I have an oily t zone and normal to dry  cheeks.


A tip I picked up from a Beauty Therapist is to use a toner after cleansing, it helps remove any cleanser left on your skin, any dirt, make up and helps clean out pores and prevent pimples. 

It also will strip away your skins natural oils. Using a regular toner can be a problem for people with oily skin because when you strip away the natural oils and feel that tight skin feeling your skin goes into overdrive to replace the oils that are no longer there which means your skins get even oiler!


The way to avoid this is to use a toner that has no alcohol in it, the alcohol is what strips the natural oils. I use the Nivea Visage Young Stay Clear Purifying Toner. It's alcohol free and I have really noticed the difference between using a alcohol toner and an alcohol free toner.

To use this take a cotton swab and pour a small amount of toner onto the swaband wipe it over your skin avoiding your eyes.

Jayde
(:

Wednesday 1 February 2012

The Hair Treatment that saved my Hair


BaByliss Pro Argan Oil.


On the back!

I prefer to use this on wet hair, If I do use it on dry hair I have to be careful not to overload my hair. The bottle says it doesn't leave a oily residue and it doesn't ... when used correctly, don't go overboard on this baby. A little goes a long way.

The reason I got this product in the first place is, I did terrible terrible things to my hair. My hairdresser was surprised I had hair left after this. But thanks to alot of care my hair survived. It was high maintenance but well worth it.

This is the terrible thing I did to my hair:


On a whim one day when I was dying one of my friends hair, we decided to dye my hair pink! I had the colour as I was using it to tint my hair. While I am naturally dark blonde I had been dying my hair a dark brown for several years. So I had to go from a dark brown to as light as I could get it. I'm not really proud of what I did to my hair, if I remember correctly I bleached my hair (yes BLEACHED) my hair a total of 4 times in 2 weeks. By the time I had done that my scalp was bright red and my hair was white at the roots and light orange at the ends.

Because I was using a red toned colour I didn't use a toner. The colour I used was Alfaparf Milano Jeans Color in Magenta. I love this colour. I really really do, I tried others but always went back to this. It's vibrant and long lasting, the colour would hold up for ages and I would only re do it because my regrowth was showing!

My hair is naturally frizzy and wavy, but nothing like the photo above, I fried my hair it felt like straw, If i brushed it when it was wet hair would come out onto my comb. I had to change my somewhat lazy hair care routine. I went from shampoo and conditioner and dying my hair to, deep conditioning twice a week using a salon shampoo and conditioner. Still it was not enough!

I went into Hair House Ware House (in Australia) and was browsing the aisles I had heard great things about Morrocan oil and picked this one up because I got more for the same price as another brand. The checkout girl was like be careful not to use to much as it can make your hair look greasy, then taking one look at my hair said although your hair will probably soak it up. And it did! 

This helped my hair so much, it cut down frizz, I added this to my hair dye to my deep condtioner pretty much anything I put on my hair I added this product too.

This product made it possible for me to do this to my hair


Special Effects Hair Dye in Cupcake.


La Riche Directions Semi Permanent Hair Color Dye in Atlantic Blue and Lilac 


Jayde
(:

NOTD: Caribbean Coral & Disco Ball


I am waiting for spring, Winter while nice at first is waaay too long. Bring on spring!!

This NOTD reminds me of spring. Any coral colour does! This one is the Sally Hansen: Hard as Nails Xtreme Wear in Caribbean Coral. This was my first time using this particular colour and I was quite impressed, I only used one coat and got opaque colour and it dried quite quickly as well!


The glitter polish is also a Sally Hansen: Hard as Nails Xtreme Wear in Disco Ball. This is my current favourite glitter polish, its very versatile and I can wear it with almost every colour. Wearing glitter polish seems to keep my nail polish on longer without chipping.


I used my Quo by Orly Strongbond (base coat) and Polish Keeper (top coat).

Another thing! My nails are currently quite short because I am dealing with some peeling issues, which I never normally have but about 2 months ago I used those Sally Hansen strips thingos and they seem to have ruined my nails! Which makes me so sad cause they are so pretty!

Jayde
:)

Friday 20 January 2012

E.L.F Essential Lipstick: Swatches and Review!

This is the first time I have tried ELF Lipsticks, as they aren't readily avaliable in Australia. That is also why you have been seeing lots of ELF products, I may have over done it but I had a list of things I wanted to try and once I settled in Canada they were within in my reach.

Anyway onto the lipsticks. These come in a variety of shades, I would recommend looking up swatches before buying as the pictures on the web site can be a bit deceptive (not always! But better safe than sorry) when it comes to colour. You can pick these up at Target in the US, I haven't seen them in a store in Canada but you can also order off their website: www.eyeslipsface.com. Shipping to Canada takes normally around 10 -15 days unless you order around peak times (like Christmas) Then it might take a little longer. 

I bought 6 of these at $1 a piece, which is a pretty good deal if I do say so myself.
They come in silver tubes with a clear strip so you can see what colour the lipstick is:


I was surprised with these lipsticks, the first thing I checked was the smell, I know a weird thing to check first but I have trouble with cheap lipstick before that smells like chemicals and has the consistency of a crayon. These however all have a nice fruity smell! 

While these aren't the most moisturising lipsticks, they didn't dry my lips out either, They seem to be on standard I've found for normal lipstick. I would probably pair a gloss with these to give a better look but that is just my personal preference. Their lasting ability is pretty standard, you will have to reapply these they aren't a long lasting formula however they aren't going to just disappear from your lips in 5 minutes.

Swatches:


Nostalgic 


This in the colour Nostalgic, it's not as light as it is in the above picture. It is a pink nude, I have to say this is my first nude colour, I have very pigmented lips so nudes can look a little strange on me.


Flirtatious 


Is a bright pink. Pretty straight forward. Something I would wear when trying to brighten my face up and look perky!


Charming 


This my favourite shade, I put this over the top of Revlon ColorStay Ultimate Liquid Lipstick in Perfect Peony, which is long lasting so the combination is a not to dry long lasting lipcolour. The Revlon Colorstay is drying by itself but easily transfered when pair with a lipgloss so paring it with a lipstick gives you the best of everything.


Classy 


This is a darker pink than Flirtatious with a sort of purple undertone almost a berry shade


Sociable 


This is my least favourite colour that I bought, I like the colour however there is glitter in it! I'm not a fan of glitter in lip products it reminds me of lipstick I used to play dress up with when I was 5. So if there was no glitter it would be an awesome colour but alas it does have glitter.


Fearless 


This is a bright red with orange under tones. This was another one I was disappointed with, the formula had been pretty consistent with the other lipsticks but this one how ever I felt was oiler in feeling on my lips. That is not something I like in a red lipstick as it makes me paranoid that it has gone everywhere on my face.


All In all these lipsticks are great! For a dollar each you can't go wrong! Just check swatches first to get an 
idea of what the colours are actually like.


Jayde


:)

Thursday 19 January 2012

Everyday Eye Look One


So this is hopefully the first of many everyday eye looks using a range of different products! Not to many high end products as I don't own many of them.

So this is look Number 1:


To start off with:

Primer! Helps your eyeshadow stay on all day and keeps it from creasing, I use Urban Decay Primer Potion Original. Mine is in the old style container, I picked mine up in a pack with original and UDPP in Sin on a cruise in the pacific in the one board duty free store for about $18 for the pack of 2.

A little goes a long way, dab a bit on you eye lids and blend where you will be placing eye shadow, just on your lid or all the way up to you brow bone or any where in between.

For this look I used the BH Cosmetics 28 Neutral Eyeshadow palette:


Ok to start the eyeshadow off take the white in the bottom left corner and using you pinky finger blend this shadow into the inner corner of your eye for a highlight. Labeled as 1.

This shade has a shimmery/frosty finish which makes it great to highlight the inner corner of your eyes, brightens, catches the light and draws attention to your eyes.


Then taking a flat shader brush, I am using one from BH Cosmetics, pack the 2nd shade in the inner 3rd of your eye. This colour is only slightly darker than my skin tone.

This colour has a satin/matte finish.


Next colour is for the other 2 3rds of the eyelid. This colour is more of a shimmery finish by having this in the middle of your eye lid you bring it out more which makes your eyes appear bigger. You can take this to your outer corner if your prefer. Use the other side of you flat shader brush to pack this colour on.


Next is the crease shade this one is a dark shade to give definition to your eyes.
This is my favourite crease colour for a neutral eye at the moment. I have been wearing it almost every day for about a week now. The brush I used for this part is a blending brush by Sigma. This an an oval shaped brush and is a flatter blending brush than say a dome blending brush, it helps you to no over do your crease when doing an everyday look. Use this brush in a "wind sheild whiper" motion in the crease of your eye from the outer corner to about half way across the eye.


I added liquid eye-liner, I use Maybelliene Line Stiletto in Blackest Black. This is a step you can skip, however if you are going to add fake eyelashes like I did having eye-liner on helps blend the eyelashes.


Next Step is Mascara I used Covergirl Lash Blast Fusion in Very Black.


For extra length and fullness for my eyelashes I added these false eyelashes. The E.L.F Essential Natural Lash Kit in Black. This was my first time using these lashes, I was really pleased how they turned out, they don't have that extreme false lash look. Although I have to say I am a little out of practice with applying false eyelashes, while the process is simple it takes practice to get them perfect!


There we go finished! I hope you enjoyed my first everyday look, feel free to leave comments if there is anything you think I could do to improve these posts.

Jayde
:)